Photoshop Basics Tutorial Part 2- Layers
This is the continuation from the Photoshop Basics Tutorial Part 1.
This post will explain about the layer components in Photoshop and its functionalities. One can go to the extent to say that without layers, Photoshop is nothing.
(Yes, layers are THAT important)
Whenever you create a new file in Photoshop, you will see a layer named as Background.
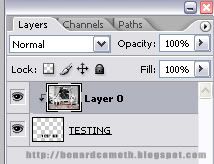
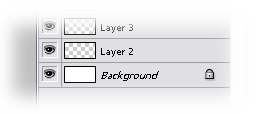 By default the background layer is white, and any layers created after that are transparent. If you noticed, there is a padlock icon at the right of the layer. That indicates that the layer is locked for editing. To enable it for editing, just double click on the layer to unlock.
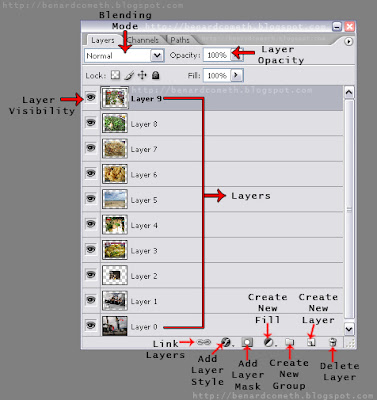
Before we continue, lets looks at the layer components.
There, done with the layer components. Before I end this tutorial, there is this one more about layers that one need to know in order to grasp the basics. The clipping layers.
 Then press the ALT key and move mouse cursor over the separating line between the two layers and you will see the icon like this:
Voila, you have your clipping layer.
This post will explain about the layer components in Photoshop and its functionalities. One can go to the extent to say that without layers, Photoshop is nothing.
(Yes, layers are THAT important)
Whenever you create a new file in Photoshop, you will see a layer named as Background.
 By default the background layer is white, and any layers created after that are transparent. If you noticed, there is a padlock icon at the right of the layer. That indicates that the layer is locked for editing. To enable it for editing, just double click on the layer to unlock.
Before we continue, lets looks at the layer components.

Layer Opacity:
Changes the opacity of the current layer, 0-100%. 0% being transparent.
Blending Mode:
Blends the selected layer with layers below it. Different type of blending mode will yield different results. (more on this in future post)
Layer Visibility:
Indicates whether the layer is visible or not. The eye icon indicates that the layer is visible and an empty box indicates that the layer is hidden from view which means that layer will not be edited.
Layers:
As shown in the picture above, Layer 9 takes precedence of all the layers from 0-9. This means that all layers are stacked with Layer 9 on top, Layer 8 below it and so forth.
Linked Layers:
This is used to link two or more layers together. Chain icons will appear on the layer whenever the layers are linked/chained together.
Add Layer Styles:
This is used to apply various effects to the selected layer. Another method is to just right click on the layer itself and choose blending options. Yet another path that one can get the layer styles is to click on the Layer menu on top and click on Layer Style.
Add Layer Mask:
This is used to create a sub-layer that modifies the selected layer without permanently editing the selected layer. For example, by giving black color to a layer mask will makes the selected layer invisible and the layer beneath will be shown.
Create New Fill
This creates a layer that can give effects to the layers beneath/below. Another path to get the Fill/Adjustment Layer is by clicking on Image at the menu on top and Adjustments.
Create New Group:
This creates a folder which can be used to organize or group layers into specific categories/group.
Create New Layer:
This creates a new layer on top of the selected layer by clicking on it.
Delete Layer:
As with the name, this delete the selected layers.
There, done with the layer components. Before I end this tutorial, there is this one more about layers that one need to know in order to grasp the basics. The clipping layers.
Clipping Layers:
This is important as it can be applied in most of image manipulation which might prove useful. The clipping layers will actually affect the area of the image that is affected by the layer below. To use the clipping mask, you will need to have two layers then hold the ALT key and move the mouse cursor over the separating lines of the two layers in the layer box.
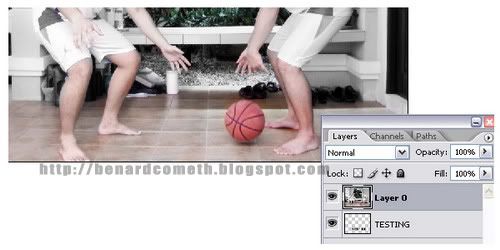
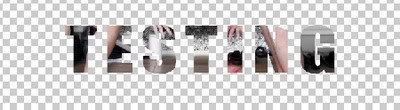
In case you are not clear yet. This is an example of clipping layer.
First have two layers. I choose to have a text typed as TESTING as the first layer and then a random picture as the second layer.
This is important as it can be applied in most of image manipulation which might prove useful. The clipping layers will actually affect the area of the image that is affected by the layer below. To use the clipping mask, you will need to have two layers then hold the ALT key and move the mouse cursor over the separating lines of the two layers in the layer box.
In case you are not clear yet. This is an example of clipping layer.
First have two layers. I choose to have a text typed as TESTING as the first layer and then a random picture as the second layer.
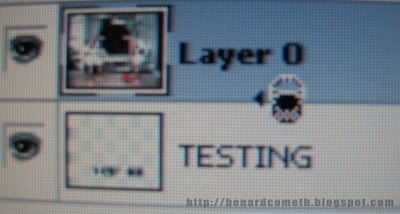
Then press the ALT key and move mouse cursor over the separating line between the two layers and you will see the icon like this:After that, click on the separating lines and you will see that the layers will become something like this:
Voila, you have your clipping layer.

this was a nice layer tutorial, do you submit to good-tutorial.com?
ReplyDelete
ReplyDeleteNope, I did not. Do I need to? =p
Hmmm...
ReplyDeleteI can't get the 'alt-key' one to work.
I'm using photoshop7.0
u use camera to take that part...is good to have a camera ... I want too...
ReplyDelete3POINT8: Hmmmm, remember you can't make clipping layer/mask with the background that normally is locked. If you can't use the ALT key, you can try using the shortcut Alt+Ctrl+G.
ReplyDelete( I am actually planning to make a post on all the shortcuts in future post =) )
LukXiuFung: Yeah, faster. You can get a screen capture software though. There are a lot of free third party software out there.
(Hmmmm, idea for future posts...=))
Well.. when i tested that, none of the layers are locked.
ReplyDeleteI can't seem to get it to work....
Oh well, I'll try again when i get back my laptop this friday.